Using Kerberos authentication for database connection
Kerberos authentication on Linux and macOS
Introduction
(shamelessly taken from wikipedia)
Kerberos is a computer network authentication protocol that works on the basis of tickets to allow nodes communicating over a non-secure network to prove their identity to one another in a secure manner.
Windows 2000 and later uses Kerberos as its default authentication method. Many UNIX and UNIX-like operating systems, including FreeBSD, Apple’s Mac OS X, Red Hat Enterprise Linux, Oracle’s Solaris, IBM’s AIX and Z/OS, HP’s HP-UX and OpenVMS and others, include software for Kerberos authentication of users or services.
Hence, we can use the protocol to have an OS independent solution for authentication across different databases. In this document, the installation and configuration for linux/mac users is provided as well as an introduction to the usage of the authentication service to connect to databases. For windows users (in the domain) the authentication is provided by default.
Installation
Kerberos client
For debian/ubuntu users (make sure you belong to the sudo group):
sudo apt-get install krb5-user
sudo apt-get install openssl # if not yet available on your system (it probably is)
During installation, you may be asked for extra configuration input. To answer that, see next section: Configure Kerberos client.
Note for Mac users: Heimdal Kerberos is installed by default, so there is no need to install a client. Mac users can jump to the paragraph “Next, adapt the krb5.conf”
Configure Kerberos client
(again, the commands assume root privileges)
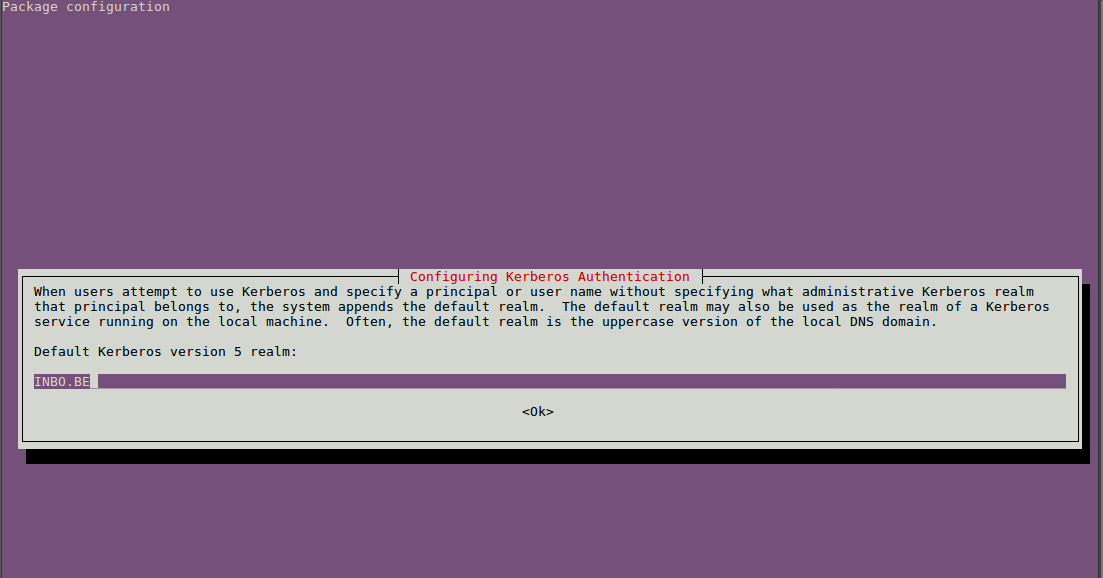
Start with the Kerberos configuration dialogue:
dpkg-reconfigure krb5-config
Use INBO.BE as the realm (this is the realm of the kerberos servers):
Make sure to use DNS to find these servers, so choose ‘NO’ if you get the below question:

Next, adapt the krb5.conf, probably available in the /etc directory. Add the following sections with configurations to the file:
[realms]
        INBO.BE = {
                kdc = DNS_Name_DomainController1.domain.be
                kdc = DNS_Name_DomainController2.domain.be
                kdc = DNS_Name_DomainController3.domain.be
                kdc = DNS_Name_DomainController4.domain.be
                kdc = DNS_Name_DomainController5.domain.be
                default_domain = domain.be
        }

[logging]
	default = FILE:/var/log/krblibs.log
	kdc = FILE:/var/log/krbkdc.log
	admin_server = FILE:/var/log/kadmind.log

[libdefaults]
	default_realm = DOMAIN.BE
	dns_lookup_realm = false
	dns_lookup_kdc = false
	ticket_lifetime = 24h
	renew_lifetime = 7d
	forwardable=  true
INBO staff can download a preconfigured krb5.conf file here:
https://drive.google.com/a/inbo.be/file/d/1q4MOWl3i-DDy1s3vwOeqPkpToa1S-3zE/view?usp=sharing.
Note for Mac users:
- When using the preconfigured
krb5.conffile, also comment out (add#) the lines following# The following krb5.conf variables are only for MIT Kerberos. - You can skip the paragraph “Time synchronisation” and jump to the next section: MS SQL Server ODBC driver and tools.
Time synchronization
This is needed in order to sync the timing of the domain controller server and client side.
Check whether the systemd-timesyncd daemon is already active on your system:
$ systemctl status time-sync.target
● time-sync.target - System Time Synchronized
     Loaded: loaded (/lib/systemd/system/time-sync.target; static; vendor preset: disabled)
     Active: active since Mon 2020-09-07 08:27:03 CEST; 59min ago
       Docs: man:systemd.special(7)

$ timedatectl status
               Local time: ma 2020-09-07 09:27:00 CEST
           Universal time: ma 2020-09-07 07:27:00 UTC
                 RTC time: ma 2020-09-07 07:27:00
                Time zone: Europe/Brussels (CEST, +0200)
System clock synchronized: yes
              NTP service: active
          RTC in local TZ: no
Note the line NTP service: active.
If you do have the systemd-timesyncd package but the unit is not active, run systemctl enable --now time-sync.target.
Further information can be found here.
Only if you don’t have the systemd-timesyncd package, install ntp instead:
sudo apt-get install ntp
If you installed ntp, check whether the following two files do exist:
/etc/ntp.conf/etc/ntp.conf.dhcp(empty file, just make sure there is a file)
MS SQL Server ODBC driver and tools
As most of the databases at INBO are SQL Server, an appropriate driver and the command line toolset is required to fully support database connections to SQL Server.
Apart from the ODBC driver, we will also install following tools:
- sqlcmd: Command-line query utility.
- bcp: Bulk import-export utility.
For Linux, follow these installation instructions.1 For Mac, installation instructions can be found here.2
Also follow the ‘optional’ instructions, as these will install the tools.
Hence, for Ubuntu 20.04 or Linux Mint 20 you would do:
sudo su
curl https://packages.microsoft.com/keys/microsoft.asc | apt-key add -
#Ubuntu 20.04
curl https://packages.microsoft.com/config/ubuntu/20.04/prod.list > /etc/apt/sources.list.d/mssql-release.list
exit
sudo apt-get update
sudo ACCEPT_EULA=Y apt-get install msodbcsql17 mssql-tools
echo 'export PATH="$PATH:/opt/mssql-tools/bin"' >> ~/.bash_profile
echo 'export PATH="$PATH:/opt/mssql-tools/bin"' >> ~/.bashrc
source ~/.bashrc
sudo apt-get install unixodbc-dev
On Ubuntu 20.04, if installing msodbcsql17 and mssql-tools fails because of incompatible unixodbc version, you can first try apt install unixodbc=2.3.6-0.1build1 unixodbc-dev=2.3.6-0.1build1.
Test installation
Kerberos ticket system
To check if the Kerberos configuration is successful, ask for a ticket by initiating with kinit:
kinit your_user_name
If no errors are prodused, check the existing tickets with klist:
klist
This should produce a list of successfully granted tickets, so something similar as:
Valid starting     Expires            Service principal
03/01/18 15:42:08  04/01/18 01:42:08  krbtgt/INBO.BE@INBO.BE
	renew until 10/01/18 15:42:08
For Mac users, note that you can also use the Ticketviewer application which can be found in /System/Library/CoreServices/Applications. Click Add Identity and enter your_user_name@INBO.BE and password.
SQL database connections
When the ticketing is working, the next step is to use the authentication to connect to the databases itself. To test this, we’ll use the sqlcmd command line tool. In a next section, we’ll focus on the ODBC settings.
Testing with sqlcmd (make sure you have an active ticket). Type quit to exit.
Inbo staff can consult a list of connection strings ( including server names ) for a server to query link
sqlcmd -S DBServerName -E
1> Select top 10 name from sys.databases;
2> Go
On Ubuntu 20.04, you may get an error:
Sqlcmd: Error: Microsoft ODBC Driver 17 for SQL Server : TCP Provider: Error code 0x2746.
Sqlcmd: Error: Microsoft ODBC Driver 17 for SQL Server : Client unable to establish connection.
If you are in that case, have a look at working solutions in this GitHub issue.
SQL ODBC connections
To support database connections from other applications (e.g. GUI environments, but also R, Python,…), the configuration of database drivers and connections should be provided in the /etc/odbc.ini and /etc/odbcinst.ini.
Make sure the ODBC driver for SQL Server is available with a recognizable name in the /etc/odbcinst.ini file:
[ODBC Driver 17 for SQL Server]
Description=Microsoft ODBC Driver 17 for SQL Server
Driver=/opt/microsoft/msodbcsql17/lib64/libmsodbcsql-17.6.so.1.1
UsageCount=1
Connecting by explicitly providing the SQL connection string to ODBC libraries/packages
INBO staff can consult a list of connection strings here. At this moment, you can actually connect using typical ODBC libraries/packages provided by R or Python:
library(DBI)
connection <- dbConnect(
  odbc::odbc(),
  .connection_string = "Driver={ODBC Driver 17 for SQL Server};Server=DBServername;Database=DBName;Trusted_Connection=yes;"
)
dbListTables(connection)
However, most recommended for INBO staff using R is the use of the inbodb package, most notably the connect_inbo_dbase() function.
import pyodbc
conn = pyodbc.connect("Driver={ODBC Driver 17 for SQL Server};Server=DBServername;Database=DBName;Trusted_Connection=yes;")
In RStudio, you can also make the connection with the GUI:
- Go to the Connections pane and click ‘New Connection’.
- In the window that opens, choose the ODBC Driver for SQL Server.
- In the Parameters field that comes next, add
Server=DBServerName;Database=DBName;Trusted_Connection=yes;.- Note that the
DBIconnection statement is visible at the bottom field of the dialog window.
- Note that the
- Click Test to verify successful connection.
- If connection is unsuccessful, try again after explicitly adding your username to the connection string:
User ID=your_username;
- If connection is unsuccessful, try again after explicitly adding your username to the connection string:
- If the test is successful, click OK to make the connection.
Beside the fact that the connection has been made (see RStudio’s R console), you also get a list of all databases (of the specific SQL Server) in the Connections pane. You can use this for exploratory purposes. Click here for more information on using RStudio’s Connections pane.
UNTESTED: Connecting after configuring odbc.ini
However, it is probably easier to provide the configuration to specific databases directly, using the /etc/odbc.ini file. For example, the DBName database can be defined as follows:
[nbn_ipt]
Driver      = ODBC Driver 17 for SQL Server
Description = odbc verbinding naar db
Trace       = No
Server      = DBServername
Database    = DBName
Port        = 1433
Next, add the DBServername
TODO: -> example in R/Python -> also available in Rstudio!
-
You can also find the debian packages of Microsoft ODBC Driver for SQL Server here. You can find separate installation instructions for
sqlcmd,bcpandunixodbc-devhere. ↩︎ -
The installation on Mac is done through Homebrew. The commands suggested in the link need to be entered in 2 turns: first install Homebrew and next issue the remaining commands. ↩︎